Some time ago i started a rebuild diary on migweb and allcorsa but i have changed plans and directions with this.
Ok then so where to start ill start with a quick recap of the start of the project, the day i collected the engine.
The engine was a bargain, its got 74,000 est on the clock and i managed to pic it up from £130 ... thank you ebay lmao
I am lead to beleive that this engine is of the late type XE, so instant thouhts was over porus head, however the head has being sent for testing, which it passed and it was then skimmed ready for the rebuild
![Smile :)](./images/smilies/icon_smile.gif)
Here is the engine when i first collected it :
![Image](http://farm4.static.flickr.com/3654/3470530467_1157e918f5.jpg)
![Image](http://farm4.static.flickr.com/3600/3471344608_5b96694d34.jpg)
![Image](http://farm4.static.flickr.com/3658/3471345474_fb2581d33c.jpg)
![Image](http://farm4.static.flickr.com/3650/3470531455_bbc01facd2.jpg)
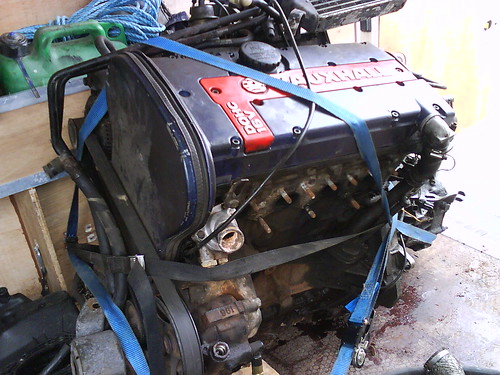
As you can see a fair bit of stuff and i even got some free bits like breaks etc because he did not want them anymore as the car was scrapped.
Part 2 - The strip down
This part has taken me quight a while as i have had no time lately to work on the engine, up till last week and i made a start again. I had managed to get all the engine stripped apart from getting the pulley nut off, this really caused me some problems to i even took the bottom end to a garage and asked them to use there impact wrench to free it but nothing would !! so in the end i had to attack it with the angle grinder anyway here is some pics :
![Image](http://farm4.static.flickr.com/3635/3486084933_b6ee66faee.jpg)
Rocker cover removed, this is being sent off to be stripped and shadow chromed.
![Image](http://farm4.static.flickr.com/3653/3486901412_ac9ab7087b.jpg)
![Image](http://farm4.static.flickr.com/3319/3486902502_f0cb75f33c.jpg)
![Image](http://farm4.static.flickr.com/3383/3486903266_5801383b48.jpg)
![Image](http://farm4.static.flickr.com/3074/3486906902_248779f54a.jpg)
![Image](http://farm4.static.flickr.com/3352/3486910122_b12bd3d43f.jpg)
![Image](http://farm4.static.flickr.com/3585/3486915938_19963f0e89.jpg)
![Image](http://farm4.static.flickr.com/3639/3488811983_f7f0cd7416.jpg)
![Image](http://farm4.static.flickr.com/3334/3488813045_dba661aaf0.jpg)
![Image](http://farm4.static.flickr.com/3331/3489628718_4084817799.jpg)
![Image](http://farm4.static.flickr.com/3635/3488815135_f951a341dc.jpg)
![Image](http://farm4.static.flickr.com/3349/3489631092_5c8dca94e9.jpg)
![Image](http://farm4.static.flickr.com/3614/3523037520_de76d6c9d9.jpg)
![Image](http://farm4.static.flickr.com/3319/3522234153_c85e72f0cd.jpg)
![Image](http://farm4.static.flickr.com/3538/3523042172_8c1ecfc584.jpg)
![Image](http://farm4.static.flickr.com/3396/3523043306_9cf3fe10e8.jpg)
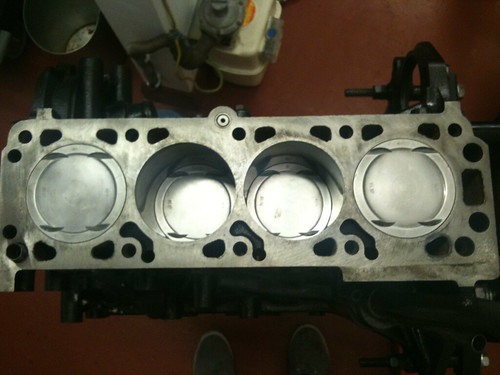
Piston bores all ok, no damage here.
Part 3 - Head cleanup
BEFORE
![Image](http://farm4.static.flickr.com/3635/3525133289_56e3e1022d.jpg)
![Image](http://farm4.static.flickr.com/3550/3525134165_498d332eff.jpg)
HALF & HALF
![Image](http://farm4.static.flickr.com/3626/3525943692_c8b4a28a25.jpg)
AFTER
![Image](http://farm4.static.flickr.com/3573/3531595970_fdd159c422.jpg)
![Image](http://farm4.static.flickr.com/3072/3531591646_c1e18d1396.jpg)
The head was then sent off at this point for testing and skimming.
Part 4 - Bottom end time
Ok so by now i had had 4 months away from the project due to being to busy moving home and breaking up with my partner so last week i fired up the project again and started working on it once more.
So here it is after a bolted it to the engine stand and set to work on it, the bottom block was a mess when i got the engine due to the bottom end seals failing and pouring oil all over the show.
![Image](http://farm5.static.flickr.com/4072/4417091764_8078c49afe.jpg)
![Image](http://farm3.static.flickr.com/2685/4417092246_25da747201.jpg)
Ready to remove sump and begine stripping crank out
![Image](http://farm5.static.flickr.com/4058/4416326847_3a85895a6a.jpg)
First coat of paint on bottom end
![Image](http://farm5.static.flickr.com/4027/4417093310_d805719361.jpg)
![Image](http://farm5.static.flickr.com/4009/4416327787_da98ff6f4c.jpg)
![Image](http://farm5.static.flickr.com/4024/4417094612_8d7a477aa6.jpg)
Second coat & Fully stripped aside from crank
![Image](http://farm5.static.flickr.com/4027/4417095796_fed77843a4.jpg)
![Image](http://farm5.static.flickr.com/4035/4416330455_da5038619e.jpg)
![Image](http://farm5.static.flickr.com/4006/4416331013_8ca88ce2af.jpg)
![Image](http://farm5.static.flickr.com/4040/4417097196_98cb244d4a.jpg)
Sump cleaned up & then sprayed
![Image](http://farm3.static.flickr.com/2758/4417097634_96b7eb2e9b.jpg)
![Image](http://farm5.static.flickr.com/4024/4417098072_f56e735a8f.jpg)
Crank removed and 100% stripped
![Image](http://farm5.static.flickr.com/4041/4417098152_c245c5f71c.jpg)
![Image](http://farm5.static.flickr.com/4012/4417100004_247d9df42a.jpg)
Now i began the rebuild process, this is going to be a little slow over the next few weeks as i have alot of bills so cant spare the money for parts, however i have the new big end and shell bearings and i have just ordered all my piston rings, this will allow me to get the bottom end put back together
![Very Happy :D](./images/smilies/icon_biggrin.gif)
I started by first cleaning up all the surfaces where gaskets will go, this will ensure a good seal when i finally get to rebuilding it.
Head gasket seating very clean
![Image](http://farm5.static.flickr.com/4035/4417098594_1527a034d4.jpg)
Bottom end seating all clean
![Image](http://farm3.static.flickr.com/2751/4417100554_161fd971a9.jpg)
Old shell bearings out !
![Image](http://farm5.static.flickr.com/4028/4416335795_3d384431b6.jpg)
All clean ready for new bearings to be fitted :
![Image](http://farm5.static.flickr.com/4051/4416336131_e09624c757.jpg)
New shell bearings and nice new bit of oil to make sure these are well lubricated before i put them back in otherwise were asking for trouble !
![Image](http://farm3.static.flickr.com/2722/4416323961_02a0d3c171.jpg)
New bearings fitted and well oiled ( you cant see the oil however there is alot on them )
![Image](http://farm5.static.flickr.com/4072/4417090438_2a75946a8c.jpg)
Crank ready to be cleaned and re-fitted to the block
![Image](http://farm5.static.flickr.com/4005/4416324927_5c3d85baa8.jpg)
Crank refitted on new bearings, i cant beleive how easy the crank turns now compaired to before i removed it, its a major improvement !
![Image](http://farm5.static.flickr.com/4055/4416325323_5a0dc016ca.jpg)
Ok up till dinner time today this is as far as i have got with it. More soon !